
[Spring] Mapper XML File
Mapper XML File
매퍼(Mapper)가 무엇인지 모른다면 [Spring] MyBatis 소개 를 먼저 읽어보면 좋을 것 같다.
MyBatis 의 가장 큰 특징은 매핑 파일이라고 생각한다. SQL문을 저장하고 매핑 Bean 입력, 반환하는 빈과의 대응 관계가 정의되어 있어 기존 SQL 문자열로 관리했던 JDBC 코드보다 훨씬 파악이 용이하다. JDBC 코드에 비하면 최대 95% 이상 감소한다고 한다. 이렇게까지 극적인 대비를 아직 느껴보진 못 했지만 멋모르고 쓸 때도 편리하다는 느낌을 받을 수 있었다.
XML Mapper 를 작성하는 개요는 다음과 같다. 먼저 DAO 클래스가 작성되면 이를 사용하는 SQL문 작성이 필요하다. XML로 작성된 Mapper의 저장 경로를 결정하고 필요한 DTD를 추가한 뒤 SQL을 작성하면 된다.
classpath: 와 같이 클래스패스 루트 경로는 src/main/resources/ 이기 때문에 그 아래 mapper 폴더를 두어 각 DAO 별로 대응되는 Mapper XML 파일을 관리하는 것이 일반적이라고 한다.
XML Mapper 만의 SQL문 작성
데이터베이스에서 정보를 조회하는 Select문을 통해 Mapper XML 의 특징을 정리해보려고 한다. 먼저 기존 방식의 id=1 인 값인 사람을 조회하는 문장이다.
String selectPerson = "SELECT * FROM PERSON WHERE ID=?";
PreparedStatement ps = conn.prepareStatement(selectPerson);
ps.setInt(1, id);
이를 Mapper XML 에서는 다음과 같이 나타낼 수 있다. 반환 타입과 파라미터를 직접 지정할 수 있어 편리하다.
<select id="selectPerson" parameterType="int" resultType="hashmap">
 SELECT * FROM PERSON WHERE ID = #{id}
</select>
또한 작성된 코드 스티펫을 다른 곳에서 활용할 수 있다. 먼저 userColums 라는 id 값으로 사용자가 가지는 컬럼들을 다음과 같이 나열해 놓는다. 이렇게 작성된 <sql id="userColumns"> id,username,password </sql> sql 태그를 다른 구문에 삽입해 사용할 수 있다.
<sql id="userColumns"> id,username,password </sql>

<select id="selectUsers" resultType="map">
 select <include refid="userColumns"/>
 from some_table where id = #{id}
 </select>
파라미터를 기존 PreparedStatement 의 ? 로 전달하는 것보다 더 편리하게 넘겨줄 수 있다. #{멤버 변수} 를 통해서 가능하다.
<insert id="insertUser" parameterType="User">
 insert into users (id, username, password)
 values ( #{id}, #{username}, #{password} )
 </insert>
위와 같이 작성하면 User 타입의 파라미터가 전달되며 각 멤버변수가 파라미터의 이름이 된다. 이를 자동으로 바인딩 해주기 때문에 타입을 지정할 필요가 없어 더욱 편리하다.
Result 를 받아오는 것 역시 Mapper 를 사용하면 더 편리하고, 적은 코드 양으로 동작시킬 수 있다. 반환되는 타입이 일반적이지 않거나 컬럼명이 멤버 변수 이름과 다를 경우 아래와 같이 resultMap 을 지정할 수 있다.
<resultMap id="userResultMap" type="User">
 <id property="id" column="user_id" />
 <result property="username" column="user_name"/>
 <result property=" hashedPassword " column=“user_password"/>
 </resultMap>
끝으로 MyBatis 에 매핑된 SQL문 쿼리가 어떻게 전달되는지를 확인하기 위해 Log4jdbc-log4j2 라이브러리를 추가해줄 수 있다. 물론 오버헤드를 가지겠지만 개발하는 과정에는 반드시 필요한 것이라고 할 수 있다.
설정 파일에 작성한 데이터소스를 변경하는 것으로 로깅 기능을 적용할 수 있다. 아래 예시는 MySQL 데이터 소스에 로깅 기능을 추가한 예시이다.
<bean id="dataSource"
class="org.springframework.jdbc.datasource.SimpleDriverDataSource">
 <property name="driverClass"
 value=”net.sf.log4jdbc.sql.jdbcapi.DriverSpy"/>
 <property name="url" value=”jdbc:log4jdbc:mysql://127.0.0.1:3306/spring"/>
 <property name="username" value=”spring"/>
 <property name="password" value=”spring"/>
</bean>
JDBC 드라이버 클래스를 net.sf.log4jdbc.DriverSpy 로 변경하고, 연결 URL 중간에 log4jdbc 라는 단어를 추가한다. 끝으로 log4jdbc.log4j2.properties 를 추가해준다.
테스트
이전에 context 를 분리해 루트 컨텍스트를 아래와 같이 web.xml 에 작성했다.
	<listener-class>org.springframework.web.context.ContextLoaderListener</listener-class>
	</listener>
	<context-param>
		<param-name>contextConfigLocation</param-name>
		<param-value>
			/WEB-INF/spring/root-context.xml
			/WEB-INF/spring/datasource.xml
		</param-value>
	</context-param>
이렇게 작성된 루트 컨텍스트 중 datasource.xml 에서 Database 와 연결되는 설정 값들을 기재해주었다.
<!-- ... -->

	<!-- DataSource : Bean 형태 -->
	<context:property-placeholder
		location="classpath:config/database.properties" />
	<bean id="dataSource"
		class="org.springframework.jdbc.datasource.SimpleDriverDataSource">
		<property name="driverClass" value="${db.driverClass}"></property>
		<property name="url" value="${db.url}"></property>
		<property name="username" value="${db.username}"></property>
		<property name="password" value="${db.password}"></property>
	</bean>

	<!-- sqlSessionFactory -->
	<bean id="sqlSessionFactory" class="org.mybatis.spring.SqlSessionFactoryBean">
		<property name="dataSource" ref="dataSource"></property>
		<property name="configLocation" value="classpath:mybatis-config.xml"></property>
		<property name="mapperLocations">
			<list>
				<value>classpath:mappers/article-mapper.xml</value>
			</list>
		</property>
	</bean>

	<!-- SqlSession 설정 -->
	<bean id="sqlSession" class="org.mybatis.spring.SqlSessionTemplate">
		<constructor-arg ref="sqlSessionFactory"></constructor-arg>
	</bean>
</beans>
src/main/resources 에 설정 파일을 두고, DataSource 등록과 mybatis-config.xml 등이 연동되고 있다. 또한 sqlSessionFactory 빈을 설정하며 Mapper 를 동시에 등록할 수 있는데, 해당 위치에 mapper 값을 여러 개 작성할 수 있다.
<?xml version="1.0" encoding="UTF-8"?>
<!DOCTYPE mapper PUBLIC "-//mybatis.org//DTD Mapper 3.0//EN" "http://mybatis.org/dtd/mybatis-3-mapper.dtd">

<mapper namespace="mappers.article-mapper">
	<insert id="insertArticle" parameterType="com.example.hello.vo.Article">
			insert into article (article_id, author, title, content)
			values (#{articleId}, #{author}, #{title}, #{content})
	</insert>

	<!-- 한 개만 반환 가정 -->
	<select id="selectArticleById"
			resultType="com.example.hello.vo.Article"
			parameterType="string">
			select article_id as articleId, author, title, content
			from article
			where article_id = #{articleId}
	</select>
</mapper>
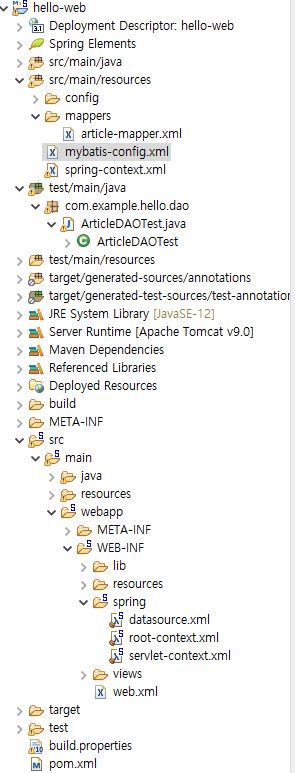
이렇게 작성된 매퍼 파일까지 들어간 최종적인 구조는 아래와 같다.
끝으로 테스트를 진행하기 위해 다음과 같이 테스트 코드를 작성하고 돌려준다.
package com.example.hello.dao;

import org.junit.Assert;
import org.junit.Before;
import org.junit.Ignore;
import org.junit.Test;
import org.junit.runner.RunWith;
import org.springframework.beans.factory.annotation.Autowired;
import org.springframework.context.ApplicationContext;
import org.springframework.context.support.FileSystemXmlApplicationContext;
import org.springframework.test.context.ContextConfiguration;
import org.springframework.test.context.junit4.SpringJUnit4ClassRunner;

import com.example.hello.vo.Article;

@RunWith(SpringJUnit4ClassRunner.class)
@ContextConfiguration("file:src/main/webapp/WEB-INF/spring/*.xml")
public class ArticleDAOTest {

	@Autowired
	private ArticleDAO dao;

	@Test
	@Ignore
	public void tesSelectArticleById() {
		Article article = dao.selectArticleById(null);

		// Assert.assertTrue : 해당 조건이 참이라고 가정
		Assert.assertTrue(article.getAuthor().equals("lee"));
	}

	@Test
	public void testInsertArticle() {
		Article article = new Article(2, "lee", "test", "test입니다");
		dao.insertArticle(article);
	}
}
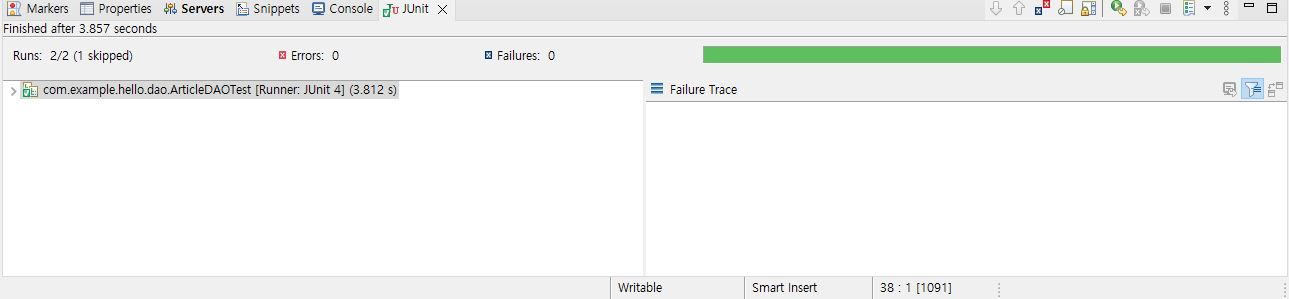
그리고 Run Junit Test 를 해주면 정상적으로 수행되었음을 알리는 초록바를 확인할 수 있다. 이로써 데이터베이스 접근에 관한 설정 방법을 익히게 된 것 같다.
아직까지는 개발환경 세팅이 뭔가 주를 이루는 것 같은 느낌이다. 지금까진 쉬웠단 얘기지… 뚝딱뚝딱 API 좀 고치고 SQL 고민하면서 힘들어 할 모습이 살짝씩 보인다…

Leave a comment