
[SW Engineering] Sequence Diagram
Sequence Diagram
Interaction Diagrams는 오브젝트들이 어떻게 메시지를 주고 받는지를 표현하는 Sequence Diagram, Communication Diagram, Interaction Overview Diagram, Timing Diagram 네 가지 다이나믹 객체 모델링을 뜻한다. 이 중 OOAD 중 OOD 단계에서 사용되는 Sequence Diagram에 대해 알아보자.
Sequence and Communication Diagram
Sequence Diagram과 Communication Diagram 모두 Code Generation을 진행하면 모두 같은 코드가 작성된다. 이것을 같은 Expressive Power를 가진다고도 표현할 수 있는데, 실제로 OOI(Object Oriented Implementation) 단계에서 Body를 작성할 때 Sequence Diagram과 Communication Diagram 모두 참조할 수 있다. 그러나 Sequence Diagram은 역할이나 오브젝트가 시간에 따라 어떤 작업을 수행하는지에 초점을 맞추며, Communication Diagram은 시나리오에 참여하는 오브젝트들 각자가 누구와 협업하는지에 초점을 맞춘다는 차이가 있다.
Basic Communication Diagram Notations
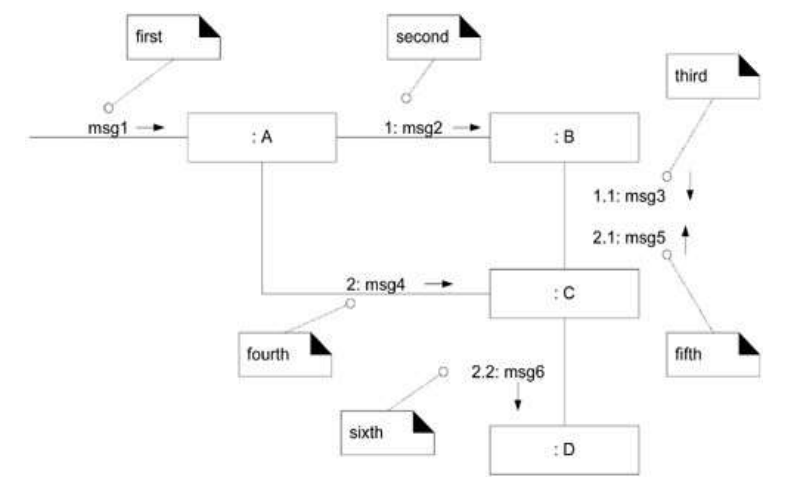
Communication Diagram은 Link와 Message로 이루어진다. 아래 그림에서는 각각의 메시지가 전달되는 순서를 Note Symbol을 이용해 표현해주고 있다.
Basic Sequence Diagram Notations
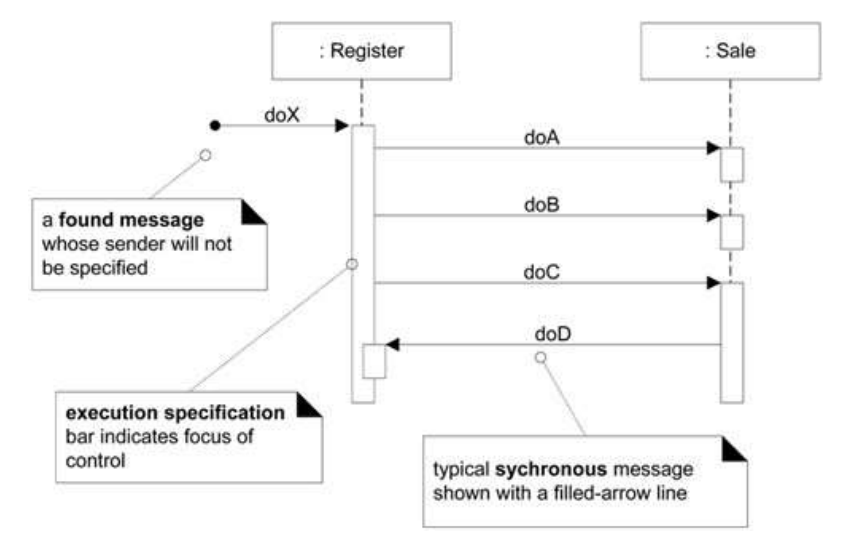
아래 그림은 Sequence Diagram의 기본적인 개념을 설명해주는 예시 자료다. 가장 먼저 doX라는 요청이 들어오면 Execution Specification을 만족하는 Operation이 수행된다. 이 때, Execution Specification 안에서 호출되는 순서인 doA → doB → doC는 바뀔 수 없다. 그리고 doC 요청에 의해 응답되는 doD는 Synchronous 동작을 설명하고 있다.
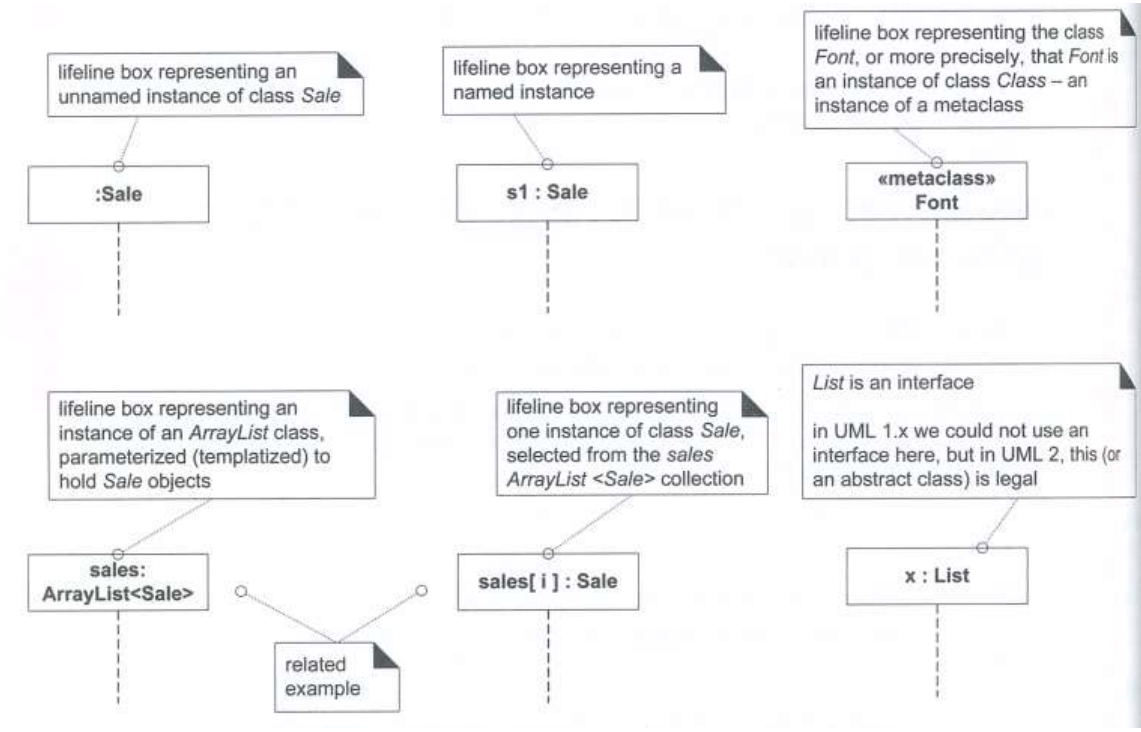
Lifeline은 수영장에서 레인을 가르는 선을 뜻하며 동시에 Sequence Diagram에서는 점선으로 나타나는 부분을 말한다. Lifeline Box는 이 끝에 붙어있는 직사각형 상자를 말하는데 이들은 시나리오에 참여하는 Roles의 이름을 가지고 있다. 시나리오에 참여하는 Roles의 특징을 설명해주는 다양한 Lifeline Box를 알아보자.
Several Types of Messages
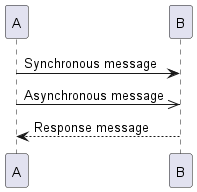
아래와 같은 문법으로 PlantUML을 작성한 예시가 코드 아래와 같다. Synchronous message는 전송자가 응답을 받기 전까지 지속되는 메시지를 말한다. 반대로 Asynchronous message는 응답을 기다리지 않고 독립적으로 실행되며, 대표적으로 Thread가 있다.
@startuml
participant A
participant B

A -> B : Synchronous message
A ->> B : Asynchronous message
A <-- B : Response message
@enduml
또한, 바깥에서 명령이 전달되거나 시간이 소요되거나 바깥으로 응답을 전달하는 것과 같은 동작을 설명하는 메시지도 존재한다. 아래는 앞에서 설명한 예제에 Activate / Deactivate 개념을 섞에 만든 Sequence Diagram 예제 코드이다.
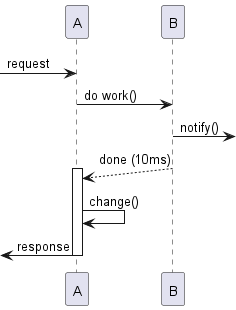
@startuml
participant A

[-> A : request
A -> B : do work()
B ->] : notify()
A (10)<-- B: done (10ms)
activate A
A -> A : change()
[<- A : response
deactivate A

@enduml
Instance Creation and Deletion
UML에서는 Object Creation과 Deletion을 지원하며, PlantUML에서도 이를 코드레벨에서 묘사할 수 있다. ++는 대상을 Activate하고, --는 대상을 Deactivate하는 것을 배웠다. 마찬가지로 **를 통해 오브젝트 생성, !!을 통해 오브젝트 삭제가 가능하다.
@startuml
alice -> bob ++ : hello
bob -> bob ++ : self call
bob -> bib ++  #005500 : hello
bob -> george ** : create
return done
return rc
bob -> george !! : delete
return success
@enduml

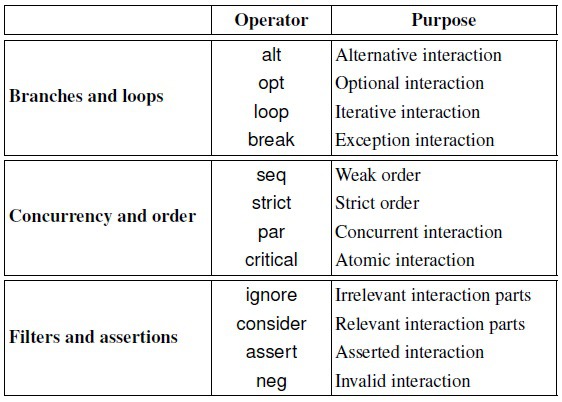
Combined Fragment and Operators
아래 Operator들을 이용해 Sequence Diagram에 여러 케이스들을 동시에 나타낼 수 있다. 간단한 예시로 PlantUML에서 어떻게 사용될 수 있는지 코드를 통해 확인해보자.
alt and opt
alt Fragment는 switch 구문을 표현해줄 수 있으며, opt Fragment는 단순 if 구문을 표현한다. 아래 코드는 Sequence Diagram을 표현해준다.
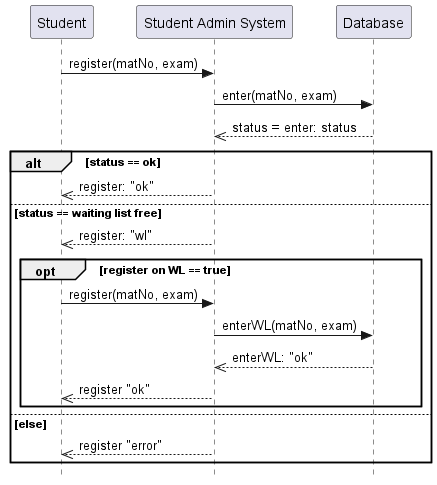
@startuml
skinparam style strictuml
Student -> "Student Admin System": register(matNo, exam)
"Student Admin System" -> Database: enter(matNo, exam)
"Student Admin System" <<-- Database: status = enter: status

alt status == ok

    Student <<-- "Student Admin System": register: "ok"

else status == waiting list free

	Student <<-- "Student Admin System": register: "wl"

	opt register on WL == true
		Student -> "Student Admin System": register(matNo, exam)
		"Student Admin System" -> Database: enterWL(matNo, exam)
		"Student Admin System" <<-- Database: enterWL: "ok"
		Student <<-- "Student Admin System": register "ok"
	end

else else

	Student <<-- "Student Admin System": register "error"

end
@enduml
loop Fragment
loop Fragment는 반복적으로 수행되는 동작을 표현하기 위해 사용된다. 중괄호 [ ] 내부에 적힌 조건을 Guarding Condition이라 하는데, 해당 조건이 참인 경우에만 동작이 수행된다. 아래는 최소 1번, 최대 10번까지 Iteration이 수행되며 수행 조건은 a < 5 인 경우에 한정하는 Sequence Diagram 이다.
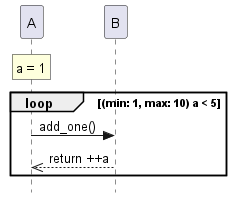
@startuml
skinparam style strictuml
participant A
participant B

rnote over A : a = 1
loop (min: 1, max: 10) a < 5
	A -> B : add_one()
	A <<-- B : return ++a
end

@enduml
break Fragment
break Fragment는 break 조건을 만족하지 않는 경우 opt Fragment와 동일하게 동작하지만 break 조건을 만족하면 내부 동작을 수행한 뒤 break를 감싸는 범위를 벗어난다. 아래 예시는 세 번째 시도까지 패스워드가 틀린 경우 해당 Sequence Diagram이 종료된다.
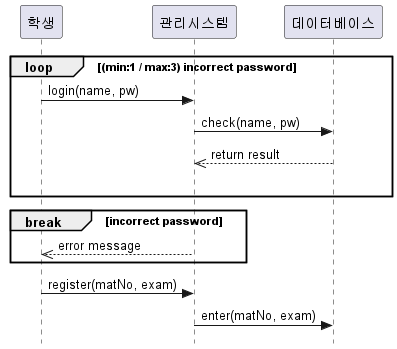
@startuml
skinparam style strictuml

participant 학생
participant 관리시스템
participant 데이터베이스

loop (min:1 / max:3) incorrect password
	학생 -> 관리시스템: login(name, pw)
	관리시스템 -> 데이터베이스: check(name, pw)
	관리시스템 <<-- 데이터베이스: return result
	|||
end

break incorrect password
	학생 <<-- 관리시스템: error message
end

학생 -> 관리시스템: register(matNo, exam)
관리시스템 -> 데이터베이스: enter(matNo, exam)

@enduml
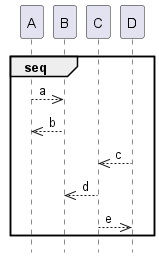
seq Fragment
seq Fragment가 붙으면 Default Order 외에 다른 순서가 존재할 수 있다는 것을 가르쳐준다. 예를 들어 아래 Sequence Diagram은 a → b → c → d → e 외에도 a → c → b → d → e, c → a → b → d → e 가 가능하다.
@startuml
skinparam style strictuml
participant A
participant B
participant C
participant D

group seq
	A -->> B : a
	A <<-- B : b
	C <<-- D : c
	B <<-- C : d
	C -->> D : e
end
@enduml
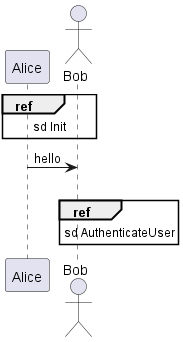
Interaction Reference
ref는 기존에 작성된 Sequence Diagram을 불러오기 위해 사용한다. 앞에 붙은 sd는 Sequence Diagram 앞 글자를 딴 것이다.
@startuml
participant Alice
actor Bob

ref over Alice, Bob : sd Init
Alice -> Bob : hello

||||

ref over Bob
  sd AuthenticateUser
end ref

@enduml
Iteration Over a Collection
같은 메시지를 모든 Object Collection에 대해 진행하는 방법도 가능하다. 예를 들어 구매목록 리스트를 순회하며 가격 정보를 전송하는 형태는 Lifeline Box 이름에 itemInfo[i]: SalesItem 형태로 리스트임을 기재하여 나타낼 수 있다.
Leave a comment